How to Declutter Craft Supplies Without the Stress
, by Maria Asvestas, 12 min reading time
, by Maria Asvestas, 12 min reading time
Say goodbye to messy craft rooms! Learn fun, easy ways to declutter your supplies and make space for creativity—without the stress!
If your craft supplies are taking over your space, you’re not alone—and we’ve got your back. Whether you’re a weekend crafter or a daily creator, we’ll show you exactly how to declutter without stress. This guide is simple, clear, and made just for you.
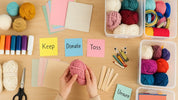
If you're looking to declutter craft supplies, start by sorting items by type, then keep what you use often and donate or toss the rest. Using labeled storage bins and setting limits on what you keep can help you stay organized and free up space.
There’s more to it than just cleaning up. We’ll walk you through every step so you can finally enjoy your craft space again.

Decluttering craft supplies can feel like a big job, but don’t worry—we’ll make it easy. You don’t have to do it all at once. Just take it one step at a time, and you’ll be amazed at how much space (and peace) you can gain.
Start by clearing a space where you can sort everything. This could be a table, the floor, or even your bed. Take out all your craft supplies and put them in one place. Seeing it all together will help you understand what you really have.
Next, sort your supplies into groups. Put all your paper in one pile, yarn in another, and so on. This makes it easier to see what you have too much of and what you use the most.
Use the table below to help you decide what belongs in each pile:
| Category | What to Look For | Helpful Tip |
|---|---|---|
| Keep | You use it often or love it | Ask: “Did I use this in the last year?” |
| Donate | Still useful but not needed | Someone else can enjoy it |
| Toss | Broken, dried out, unsafe | Don’t feel guilty—trash it |
| Unsure | Can’t decide right now | Place in a box—revisit in 30 days |
Be honest with yourself. If you haven’t used something in over a year, ask yourself if you really need it. Most crafters hang on to supplies “just in case,” but that just leads to clutter.
Once you’ve decided what to keep, set limits. For example, keep just one bin of fabric scraps or two drawers of stamps. Limits help keep things tidy going forward.
Now, organize what’s left. Use clear bins so you can see what’s inside. Label everything. Stackable bins, rolling carts, and drawer dividers work great. Use vertical space with pegboards or wall shelves if you can.
Remember, you don’t need a Pinterest-perfect craft room. You just need a space that works for you and helps you enjoy creating again.
Next, let’s talk about why it’s so hard to let go of craft supplies—and how to handle those tricky emotions.

Let’s be honest—craft supplies are fun, colorful, and full of creative promise. It’s easy to keep things because they feel special or “might be useful someday.” But over time, all that stuff can turn into clutter that makes it hard to enjoy your space.
One reason it’s hard to let go is because of emotions. You might feel guilty for spending money on something you never used. Or you may feel attached to things because they remind you of a person, project, or memory.
Here are a few common thoughts that make decluttering tough:
These thoughts are totally normal! But remember, keeping too much can block your creativity. A cluttered space often leads to frustration and stress, which can take away the joy of crafting.
Use the table below to help reframe these thoughts in a more helpful way:
| Thought That Holds You Back | A Better Way to Think About It |
|---|---|
| "I might need this someday." | If I haven’t used it in a year, I probably won’t. |
| "I spent good money on this." | The money is already spent—freeing space is valuable too. |
| "This has sentimental value." | Take a photo to keep the memory without the clutter. |
| "I could use this for a project." | If you don’t have a plan for it now, let it go. |
"Letting go of the old makes space for new creativity."
Up next, we’ll help you figure out exactly what to do with all those unwanted craft supplies so they don’t go to waste.

Now that you’ve made some space, you’re probably wondering what to do with the stuff you’re not keeping. Don’t worry—there are plenty of ways to give your extra supplies a second life. You can help others, be kind to the planet, and feel great about letting go.
One of the best things you can do is donate your supplies. Lots of places would love them, like schools, daycares, art programs, community centers, and even nursing homes. Just make sure everything is clean and in good shape.
You can also sell supplies online. Try Facebook Marketplace, eBay, Craigslist, or your local Buy Nothing group. You might even make back a few dollars while clearing space!
If something can’t be donated or sold, think about upcycling. Turn old scraps into gift tags, collages, or handmade cards. You’ll use it creatively instead of letting it pile up.
If you’re shopping for replacements or must-haves, use this ultimate guide to buying arts & craft supplies online to make smart choices.
Recycling is another smart move. Paper, plastic, and fabric can often be recycled or reused. Check with local recycling programs to see what they accept.
| Type of Supply | Best Option | Notes |
|---|---|---|
| Construction Paper & Cardstock | Donate to schools or kids’ programs | Make sure it’s not torn or wrinkled |
| Yarn & Fabric Scraps | Donate or upcycle | Great for weaving or scrap projects |
| Paints & Glues | Donate if unopened | Many places can’t accept open containers |
| Beads, Buttons, & Small Items | Donate to crafting groups | Perfect for mixed media or sensory bins |
| Plastic Bins or Organizers | Sell or reuse at home | Helps others organize too! |
As you can see, there’s always a good use for your extras. And once you’ve cleared the clutter, it’s time to get everything you’re keeping neatly organized. Let’s head into the next step—setting up your craft space so it works like magic.

Now that you’ve cleared the clutter, it’s time to make your space neat and easy to use. A good craft space doesn’t have to be big or fancy—it just needs to be organized in a way that makes you happy and helps you find things fast.
Start by grouping similar items together. Keep all your markers in one place, your glue in another, and your paper stacked neatly. This helps you know exactly where to look when you need something.
If you have a small area, use vertical space. Shelves on the wall can hold jars, boxes, and baskets. Even the back of a door can be a great place for hanging storage.
You can also keep a supply list or use a simple app to track what you have. This stops you from buying things you already own and helps you plan your next projects.
Use the chart below to pick the best storage tools for your space and supplies:
| Storage Option | Best For | Pros |
|---|---|---|
| Clear Bins | Grouping supplies visibly | Easy to stack and see inside |
| Rolling Carts | Small or shared spaces | Portable and compact |
| Pegboards | Tools, scissors, ribbons | Uses vertical space, customizable |
| Drawer Dividers | Small items like beads, buttons | Keeps drawers neat |
| Wall Shelves | Bins, jars, books, display items | Saves floor space |
| Labels | Any storage container | Helps you stay organized |
Remember, this is your creative space—set it up so it feels fun and inspiring. You’ll enjoy your crafts more when everything is in reach and easy to find.
For even more smart storage ideas that won't break the bank, check out these genius hacks for organizing crafts supplies on a budget.
Now that your supplies are sorted and stored, let’s talk about how to keep it that way so your space stays neat for the long haul.

You’ve worked hard to get your craft supplies in order—now let’s keep it that way! Staying organized doesn’t have to be difficult. With a few simple habits, you can enjoy a tidy, creative space every day.
Start by putting things back where they belong after each project. It only takes a few minutes and keeps messes from piling up. Make it part of your clean-up routine, just like washing your brushes or wiping your table.
You can even make staying organized fun! Use colorful labels, reward yourself with a craft break, or invite your kids to help. When your space is clear, it’s easier to get inspired and be creative.
Use the chart below as a quick guide to keep your craft area under control:
| Habit | What It Does | How Often |
|---|---|---|
| One-in, one-out | Keeps your stash from growing too fast | Every time you shop |
| Monthly mini-declutter | Clears out unused or broken items | Once a month |
| Track what you use | Helps avoid buying duplicates | Ongoing |
| Set space limits | Keeps each supply in its place | Ongoing |
| Clean up after crafting | Prevents messes from building up | Every time you craft |
All these small steps help keep your space calm and clutter-free. Now let’s bring everything together and wrap up with a quick recap of what you’ve learned!

You did it! You learned how to declutter your craft supplies without the stress. From sorting your stuff, letting go of the extras, donating and organizing, to keeping your space neat—you now have all the tools to keep your craft zone calm and fun.
Ready to get crafting? Here’s everything you need to start crafting today.
Remember, a tidy space helps your creativity shine. Keep using these tips, and you’ll enjoy crafting even more. Now go make something amazing—you’ve earned it!
If you enjoyed this article, you'll love these products.
$2.99 $1.00
$7.99 $3.99
$6.99 $3.99
$2.99 $2.49
$1.99


